Walk into any busy lab or clinic, and you’ll spot coats slung over chair backs, hooks overflowing by the door, and that one unclaimed lab coat sitting in a heap. It’s a hygiene risk and a daily time-suck for anyone racing to grab clean PPE between shifts.
You don’t need a renovation budget or a facilities team to solve lab coat storage . Whether you’re managing a two-person research space or a hospital wing with dozens of staff cycling through gowns hourly, there’s a setup that fits your square footage, workflow, and contamination protocols.
Below are eight practical storage systems—from simple wall hooks to full cabinet setups—so you can pick the one that actually works for your space.
Labelled Wall Hooks: Best For Small Labs And High-Turnover Spaces
Twelve people. Twelve hooks. Zero confusion about whose lab coat is whose. That’s the entire logic behind labelled wall hooks, and it’s why they remain the go-to lab coat storage fix for small teams and shift-heavy environments.
How it works : assign one fixed hook per person and tie it to their name, employee ID, or shift number. For labs running 3–12 people, aim for a 1:1 or 1:1.2 hook-to-worker ratio so temporary staff and visitors have a spot too. A standard 24 in × 4 in wall-mounted hook strip with 6 double hooks covers a small team without eating up wall space.
Labelling that works : full-time staff get name and employee ID, rotating shift workers get team number and seat number, and visitors get date and temp ID. Write it on a wipeable label placed just above each hook.
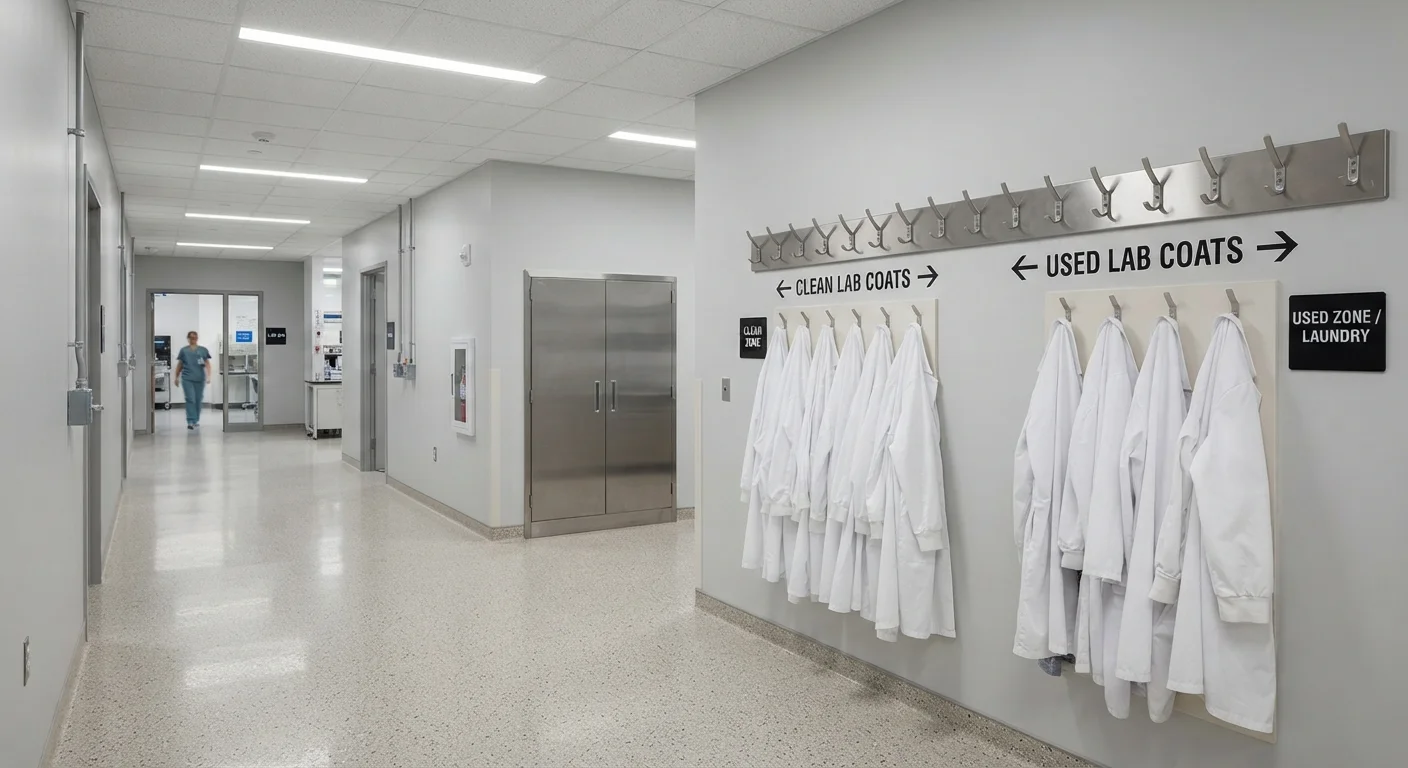
Separate clean coats from used ones . Set up two hook sections: one strictly for clean coats ready to grab, one for used coats waiting on laundry. Never let someone re-hang a worn coat in the clean zone.
What to buy: 304 stainless steel hook strips (16 Ga, brushed finish) hold up best in cleanrooms and pharma settings. Budget-conscious labs can use adhesive or magnetic plastic hooks, which need no drilling and are rated around 10 lb each, plenty for a coat. Fisherbrand’s 2.75 in adhesive hooks run cheap; SP Bel-Art’s 3-pack sits around $50.55.
Wall-Mounted Coat Racks for Shared Labs and Clinics

UC Berkeley’s EH&S department officially lists wall-mounted racks as an approved lab coat storage option. This is institutional best practice.
Placement matters more than the rack itself. Mount it at the entrance to your gowning area or clinic, right where people transition from “outside world” to “workspace.” This stops the walk-in-then-walk-back-out shuffle. For shared labs, keep the rack near the changing point but off the main operational bench. Wall-mounted systems free up floor space.
Sizing depends on your setup. Clinical settings typically need racks about 1200mm wide by 2000mm tall by 350mm deep. Tighter spaces can use a compact Ø33mm stainless steel hanging rod on three wall brackets.
Hooks vs. rods: Hooks work better for separating lab coats , visitor jackets, and bags into distinct zones. Rods work with matching hanger systems, common in hospital changing rooms with higher staff turnover.
Material and mounting: 304 stainless steel is standard in cleanrooms, gowning rooms, and pharma areas. It wipes down easily and resists corrosion under frequent disinfection. Look for racks with roughly 55mm of wall clearance; that gap allows airflow behind the coats, which matters for hygiene in shared spaces.
Dedicated Garment Racks for Medium to Large Workspace Organization
Twelve people sharing four hooks eventually breaks down. Once your team crosses that threshold, a proper garment rack does the heavy lifting that hooks can’t.
Straight-arm racks let you organize by size or coat type. Standard arms run 16 in , and a 4-way straight-arm rack measures 41.7 in wide, 48–72 in tall , holding up to 175 lb . That’s real capacity for a busy lab coat rack setup.
Slant-arm racks trade some density for speed. Arms extend to 18 in , giving each garment 7–8 positioning points , so staff can scan and grab without digging. A 4-way slant configuration runs about 42 in × 42 in .
Mixed-arm racks combine two straight and two slanted arms. Common specs: 16 in straight arms, 18 in slant arms , 48–72 in tall , on a 34 in × 34 in base . That gives you a middle ground for laboratory workspace organization when you need both volume and quick access.
Calculating Your Footprint
Multiply width by depth, divide by 144 for square feet:
-
4-way straight-arm : ~1,740 in² ≈ 12.1 ft²
-
4-way slant-arm : ~1,764 in² ≈ 12.25 ft²
-
2-way rack : 32 in × 12–15 in ≈ 2.7–3.3 ft² , perfect for narrow aisles
If you’re tight on wall space, a 1-way slant rack with a 10 in × 14 in base slots into corners other racks can’t touch. Budget at least 12 ft² per station for full 4-way setups, or go 2-way if floor space is scarce.
Personal Storage Lockers: Reducing Cross-Contamination Risk In Hospitals
WHO’s TB guidelines require that laboratory coats and gowns be stored separately from personal clothing. Full stop. Clean gowns and used gowns need different zones too. Hospitals that skip this step are asking for cross-contamination.
The locker setup that actually complies is one locker per employee, with street clothes and workwear physically separated inside. Put clean items on the upper shelf or left side, used or worn items on the lower shelf or right side. Never let them touch.
Sizing that works for hospital changing rooms
-
Depth : 450mm minimum. Shallower lockers force folding and stacking, which defeats the purpose.
-
Width : 300–450mm per person for single-file setups; go 500–600mm if staff also need space for bags, shoes, or a separate laundry bag.
-
Standard medical locker dimensions : 1800mm H × 500–900mm W × 470–500mm D.
-
Ultra-slim option : 1775 × 200 × 450mm. It has a narrow footprint but still fits a top shelf plus a garment hanging rail.
What to look for when buying?
-
Ventilated or louvered doors to cut moisture and odor buildup, especially for lockers storing worn coats.
-
Steel construction , a cleanable surface, and fixed installation – prevents tipping and sliding.
-
Lockable access : key, PIN, or card entry depending on what’s stored (add an internal lockbox if the locker also holds medications).
-
Adjustable shelving plus a hanging rail , not just hooks. Hooks alone lead to folding, and folding traps contamination in creases.
Coats should get washed weekly at minimum, sooner if visibly soiled. A locker system with real separation makes that rotation easy to track and enforce.
Drawer Storage For Folded Clean Lab Coats: Backup Inventory Management
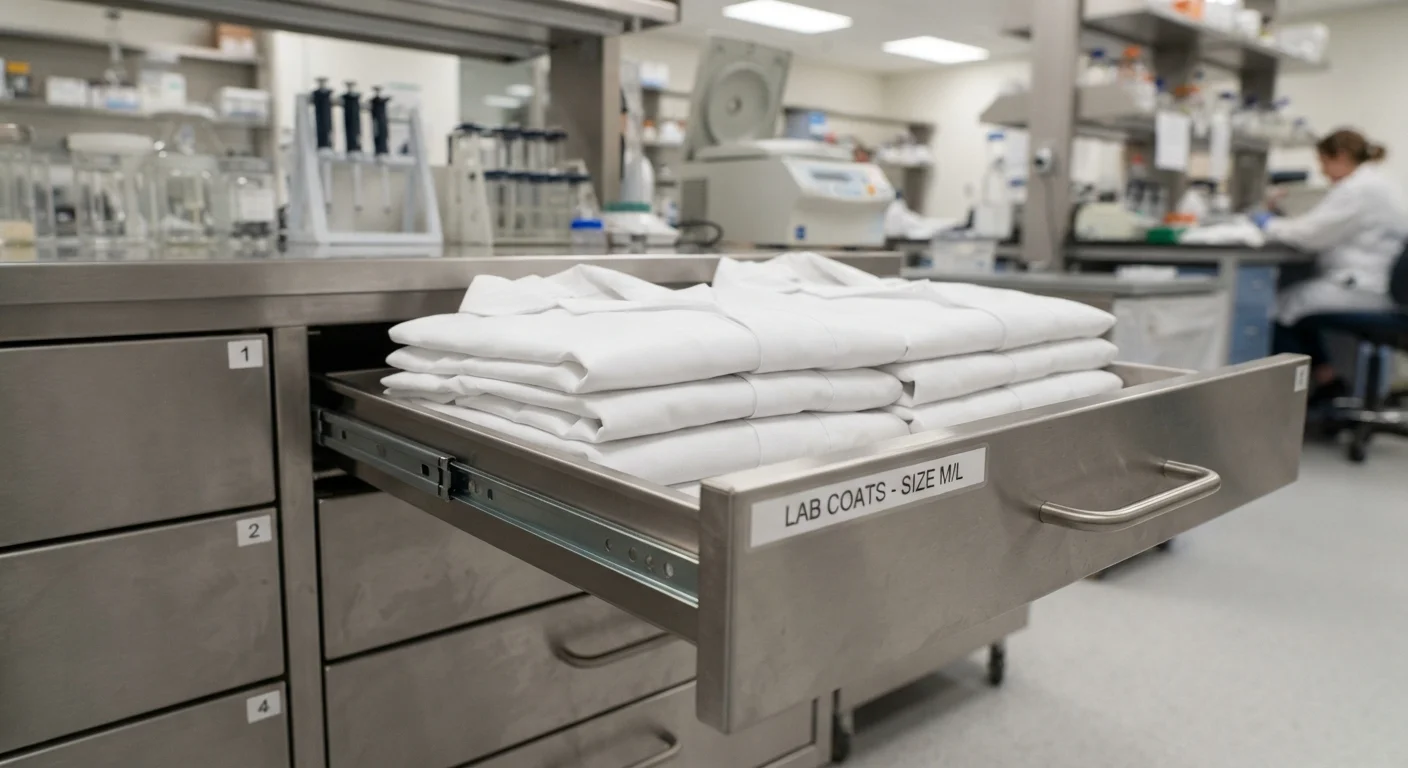
Berkeley EHS keeps it simple. Fold clean lab coats and stash them in a labeled drawer until someone needs them. No special cabinet required. Just a drawer, a label, and a system.
Assign one drawer per size or role, such as small, medium, large, or technician, researcher, visitor. Put a durable, chemical-resistant label on the front. Color-code by category if you have multiple teams; use alphanumeric codes if things get more complex.
For high-turnover labs, placement matters. Keep drawers closest to the workbench, fume hood, or casework, wherever people grab coats most often. Shallow drawers with dividers beat deep ones because you can see stock and rotate it easily.
Build a drawer map. Print or laminate a diagram showing drawer numbers and contents, and post it near the workstation. Larger labs should pair that with a digital log that tracks quantities and restock timing.
Keep clean folded coats as buffer stock in drawers, ready to swap in when someone drops off a soiled one for laundering. Soiled coats get bagged, sealed, and labeled separately with name, date, and any hazard flags. Berkeley specifically calls out H-3/Tritium when relevant. Never let clean and dirty share drawer space.
Audit monthly or quarterly depending on turnover. Check for missing items, damage, and low stock. Clip-style drawer labels run about $2.99 for a 10-pack, so there’s no excuse to skip labeling.
Laundry Bags Or Soiled-Bin System: Managing Dirty Lab Coats
A soiled coat left on a bench creates a contamination pathway. The fix is a designated bag-and-bin system that catches dirty coats the moment they come off.
Bag specs that work are waterproof, leak-proof, nonporous, and in good repair. Bags must close and hold full loads without tearing. Never overfill; tie them off tight. Biologically contaminated coats get double-bagged. An inner bag goes in before the main soiled-linen bag.
Color-coding matters for outside laundering. If a contractor handles pickup, use color-coded, labeled bags. Contaminated coats go in red. Standard soiled coats under normal precautions can skip color-coding if everyone follows protocol, but leak-proofing is non-negotiable. Many campuses use clear bags for simple pickup-and-drop-off routines.
For removal to storage, take the coat off immediately. Don’t leave it on a workstation. Check for biological, chemical, or radiological contamination before it goes anywhere near a laundry bag. Pull sharps and pocket items first. Blot small splashes. Glove up while bagging, then doff. Seal, label if policy requires it, and stash it in a designated soiled area until pickup.
Some coats skip laundry. Volatile carcinogens, strong-smelling chemicals, concentrated acids, and heavily contaminated coats go to hazardous waste, not the washer. When laundering is appropriate, on-premises machines should hit 160°F wash, 120°F rinse, or run the max fabric-tolerated temperature for 25 minutes. Wash lab coats separately from towels and cleaning cloths.
Dedicated Coat Station Near Lab Entrance: Fast Access Design For Efficiency
MIT’s approach nails this: bundle a hook, a bin, and a sign into one station at the door. Their downloadable bin labels come in three sizes—8.5×11 in, 4×12 in, and 8.5×13.32 in—with the 4×12 in version built for tight corners or bins pushed flush against a short wall.
Layout logic matters more than furniture choice. Put the coat hook where people hit it first walking in, then place the waste bin right beside it so nobody backtracks to toss trash. Ohio State’s lab rules take this further: staff “use the coat hook that corresponds with your station number,” with hooks labeled by station number for easy tracking. That same policy bans coats and bags from aisles, floors, or under-bench storage—everything stays at the hook.
Yale’s lab design guide pairs this with a safety station near the main door: fire extinguisher, phone, visitor goggles, safety postings. Signage should sit at eye level, right where people decide what to do next, using images over text per StopWaste guidelines. Oklahoma State recommends door-adjacent (not on-door) signage, plus larger 6×6 in markers for eyewash stations and extinguishers.
Minimum setup : numbered hooks, a nearby labeled bin, a safety info card, and a “lab coats only” boundary sign—compressing entry, storage, and disposal into one motion.
Bulk Clean-Storage Cabinet System: Stock Room And Disposable Inventory Solutions
One overstuffed shelf in a stock room can undo every hygiene protocol you’ve built elsewhere. Bulk lab coat storage needs its own set of rules, especially when you’re managing disposable inventory or cleanroom-grade garments at scale.
Airflow is non-negotiable. Cleanroom storage cabinets should hit 5–25 air changes per hour (ACH). If your cabinet connects to a cleanroom’s air supply, match it to the room’s classification. ISO Class 6 environments need 150–240 ACH with airflow around 25–40 fpm, and particle counts capped at 1,000,000 per m³ above 0.1 μm. ISO Class 4 spaces run hotter, with 300–540 ACH and 50–90 fpm.
Material and filtration specs that hold up : SUS304 stainless steel bodies, SUS430 fan filter units (FFU), and HEPA filtration rated 99.99% at 0.3 μm. A typical cabinet footprint runs W1000 × D650 × H2440mm, with roughly W920 × D600 × H1850mm of usable interior space.
For disposable lab coats prone to moisture damage , a low-humidity cabinet works better than open shelving. A 98L stainless steel dry cabinet holding 1–3% RH fits in 448 × 400 × 688mm, with three adjustable shelves inside.
Stock Room Rules For Bulk Storage
-
Keep cartons 10cm (4in) off the floor , minimum
-
Maintain 30cm (1ft) clearance from walls and other stacks
-
Cap stacking height at 2.5m (8ft)
-
Never mix disposable coats with contaminated PPE or hazardous materials
-
Organize by batch for traceability, and rotate stock first-in, first-out
Choose cabinets with adjustable, perforated shelving—solid shelves trap moisture and block airflow between layers.
Choosing The Right Lab Coat Storage Setup By Workspace Size
Team size decides your setup faster than budget does. Match your lab coat storage to headcount first, then adjust for cash flow.
1–6 people : One hook per person, plus a backup drawer for spares. A 24 in × 4 in six-hook strip covers this range easily. If anyone needs more than one coat, add a locked drawer instead of doubling up on hooks.
7–25 people : Split clean and dirty. Wall racks hold ready-to-wear coats; a separate laundry bag station catches soiled ones. Budget one hook cluster per 3–5 people, plus a labeled laundry bag point nearby.
25+ people : You’re in locker-and-station territory now. Personal lockers store street clothes and bags; a centralized coat station handles clean pickup and dirty return. Large hospitals often duplicate this setup across floors to cut foot traffic.
Budget Tiers That Match Each Setup
-
Low budget : Hooks, paper or acrylic labels, one laundry bag. Cheapest option, but capacity is tight.
-
Mid budget : Stainless hooks, labeled tags, dedicated laundry bag stands. Best balance of durability and upkeep.
-
High budget : Metal lockers plus multi-point coat stations. Costs more upfront, but you win on compliance and lost-coat tracking.
Places Lab Coats Should Never Live
Skip offices, break rooms, kitchens, hallways, and bathrooms — most lab safety policies ban storage there outright. Never hang a coat on the same hook as a backpack; that mixes clean fabric with whatever’s riding in someone’s bag. And don’t send lab coats home for washing. Keep laundering on-site or through a designated pickup service.
Conclusion
A clean, functional lab comes from smart choices about where and how you store gear. Whether you’re working with a single wall hook setup in a small clinic or a full bulk clean-storage cabinet system across multiple departments, the right lab coat storage approach comes down to matching your space, team size, and contamination risks to the right tool.
The real win is a system that combines efficiency, professionalism, and compliance and actually gets used. Start small by auditing your current setup, identifying your biggest pain point (clutter, cross-contamination, or slow turnaround), and picking one idea from this list to implement this week.
If you’re ready to upgrade beyond DIY hooks and racks, explore Morntrip ‘s storage solutions built specifically for lab and medical environments.