Ordering the wrong lab coat size sounds like a minor inconvenience, until you’re staring at a box of 50 disposable coats that are either too tight to move in or so baggy they snag on lab equipment. For procurement teams and safety managers, that’s a compliance risk and a wasted budget.
Getting your lab coat size right isn’t guesswork. It comes down to three measurements—chest, length, and sleeve—and knowing how to read them against a proper lab coat sizing chart.
Below you’ll find step-by-step measuring instructions, a size-by-size reference chart in both centimeters and inches, and practical guidance for tricky cases like layering over scrubs or fitting non-standard body types. By the end, you’ll know exactly which size to order and why it’ll fit right the first time.
Why Getting Lab Coat Size Right Matters?
A 2022 CSA Group study found that 58% of women in specialized work settings wore PPE that didn’t fit, and nearly one-third skipped wearing it altogether because of fit problems. That’s a direct safety gap.
Poor protective lab coat fit creates real hazards on both ends. Too tight, and you lose dexterity—slower reactions, sloppy pipetting, restricted movement when it matters. Too loose, and sleeves dip into chemicals, fabric snags equipment, or coats drag through sterile zones and contaminate them.
Disposable lab coat materials don’t stretch, and you can’t hem or alter them like fabric coats. Get the size wrong, and there’s no fixing it—just a return, a delay, or a worker going without protection.
How To Measure: Chest (The Primary Sizing Reference)
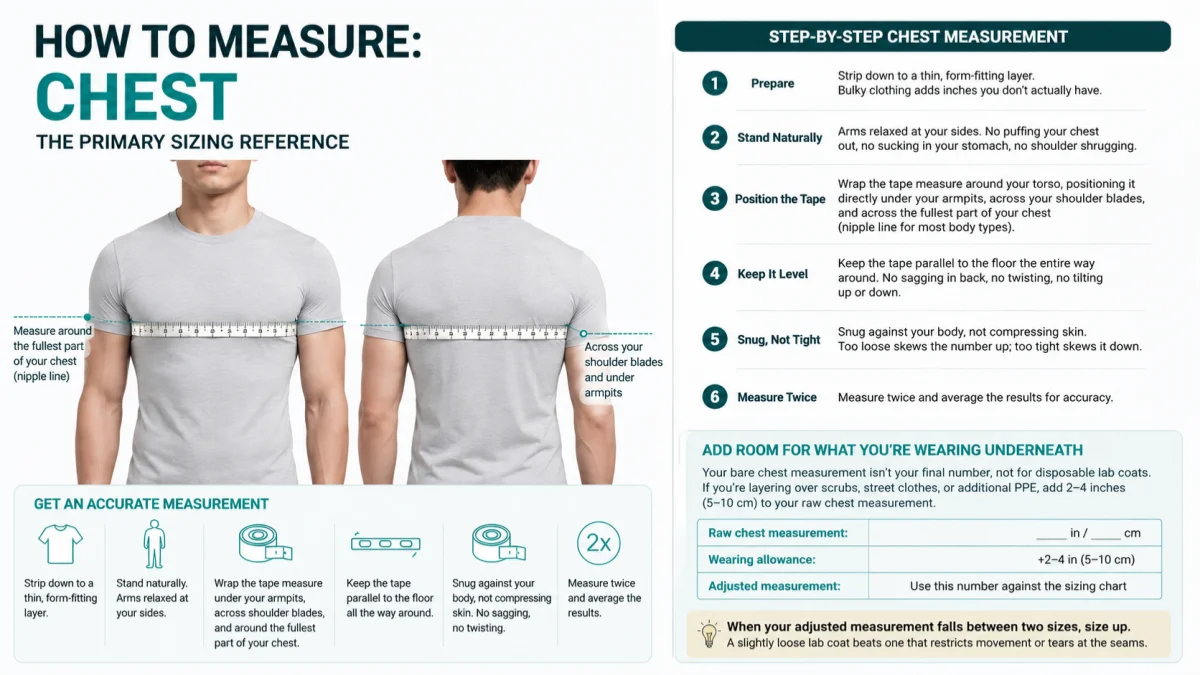
Chest measurement makes or breaks your lab coat fit. Get this one number right, and everything else falls into place. Get it wrong, and no amount of adjusting the length or sleeves will save you.
Here’s why chest measurement carries so much weight. For any upper-body garment—lab coats, scrubs, PPE, jackets—the chest measurement determines whether you can move through the front panel, back width, underarms, and shoulder blade area without restriction. Waist and hip measurements mostly affect how the hem sits. They don’t determine whether you can actually get the coat on and move in it. That’s why chest comes first in any lab coat sizing chart, before you even look at length or sleeve numbers.
Step-by-Step Chest Measurement
-
Strip down to a thin, form-fitting layer. Bulky clothing adds inches you don’t actually have.
-
Stand naturally. Arms relaxed at your sides. No puffing your chest out, no sucking in your stomach, no shoulder shrugging.
-
Wrap the tape measure around your torso , positioning it directly under your armpits, across your shoulder blades, and across the fullest part of your chest (nipple line for most body types).
-
Keep the tape parallel to the floor the entire way around. No sagging in back, no twisting, no tilting up or down.
-
Snug against your body, not compressing skin. Too loose skews the number up; too tight skews it down.
-
Measure twice and average the results for accuracy.
Add Room For What You’re Wearing Underneath
Your bare chest measurement isn’t your final number, not for disposable lab coats . If you’re layering over scrubs, street clothes, or additional PPE, add 2–4 inches (5–10 cm) to your raw chest measurement. This is standard practice across garment sizing and fit guides for a reason: it accounts for wearable space, not just body circumference.
Record it this way:
-
Raw chest measurement : ___ in / ___ cm
-
Wearing allowance : +2–4 in (5–10 cm)
-
Adjusted measurement : use this number against the sizing chart
When your adjusted measurement falls between two sizes, size up. A slightly loose lab coat beats one that restricts movement or tears at the seams.
How To Measure: Body Length (Coverage & Protection)
Length is where most disposable lab coats fail you—not the chest or sleeves. Length determines whether your lab coat actually protects you when you bend, sit, or reach, not just when you’re standing still.
Lab benches sit around 90–100 cm high, and chemical splashes from pouring, pipetting, or rinsing glassware typically land in the mid-thigh to lower-leg zone. If your coat’s hem stops at mid-hip (roughly a 60–65 cm length), you’ve got a gap. Sit down on a lab stool, and that gap widens into what fit engineers call the exposure triangle. That’s bare skin right where splashes hit hardest.
Step-by-Step Length Measurement
-
Stand straight, feet 20–30 cm apart. No slouching, no leaning forward—even a 10–15° forward tilt adds 1–2 cm to your reading and throws off the sizing chart.
-
Locate your shoulder point. This is where your collar seam meets your shoulder seam. It’s your starting reference for every lab coat length guide.
-
Measure straight down from that shoulder point, over the fullest part of your chest, to your target hemline.
-
Set your target hemline based on protection level:
-
Light splash protection: mid-thigh (roughly 80–90 cm total length)
-
Corrosive or high-risk chemical work: 5–10 cm above the knee (roughly 95–110 cm total length)
-
-
Repeat the measurement twice. Anything more than a 0.5 cm difference means you’ve shifted your reference point—start over.
Why 10 cm Makes a Real Difference?
A hem that’s 10 cm shorter than recommended exposes an extra 150–250 cm² of skin around the upper thigh—the exact band that takes the brunt of splash exposure during pouring or bending. For corrosive acids or bases, that exposure needs less than 1–2 seconds to cause first- or second-degree chemical burns. A 5–10 cm length difference is a safety threshold, not a cosmetic one.
Height-Based Length Reference
Static measurements don’t account for movement, so protective lab coat fit standards build in 7–10 cm of dynamic allowance beyond your standing measurement. Use this table as a starting point, then adjust for your protection level:
|
Height Range |
Mid-Thigh Coverage (Moderate) |
Above-Knee Coverage (High Protection) |
|---|---|---|
|
5’2″–5’4″ (157–163 cm) |
80–85 cm |
90–100 cm |
|
5’5″–5’6″ (165–168 cm) |
82–88 cm |
95–102 cm |
|
5’7″–5’8″ (170–173 cm) |
85–90 cm |
98–105 cm |
|
5’9″–5’10” (175–178 cm) |
88–93 cm |
100–108 cm |
|
5’11″–6’0″ (180–183 cm) |
90–95 cm |
103–110 cm |
If you’re heavier-built through the midsection, add 2–3 cm to the front length so the hem stays level all the way around. If your torso-to-leg ratio is unusual, skip the table math and go straight to the seated test below.
The Seated Coverage Test (Don’t Skip This)
A lab coat that fits standing can still fail sitting down. Before you finalize your order, sit on a lab stool. The hem should still cover your upper thigh completely, with no exposed waistband and no gap at the hip. Bend forward 30° with arms extended. The front hem shouldn’t ride more than 5 cm above your natural waistline. If it does, size up in length or plan for additional layered protection. Reach overhead, then bend. If the hem lifts 4–6 cm or more during normal movement, you need extra length. Garment makers build in that 7–10 cm dynamic allowance specifically to prevent this.
No tape measure on hand? Use your hand as a rough gauge: palm-to-fingertip runs about 10 cm, elbow-to-fingertip runs about 45 cm. It won’t replace a proper lab coat sizing chart, but it’s enough to spot a 10 cm shortfall during a quick field check. If you’re measuring multiple people for a bulk order, lock in one consistent shoulder-point and waistline definition across the board. Inconsistent reference points are the fastest way to end up with a 2+ cm spread in your data and mismatched sizes across your team.
How To Measure: Sleeve Length (Wrist Coverage)
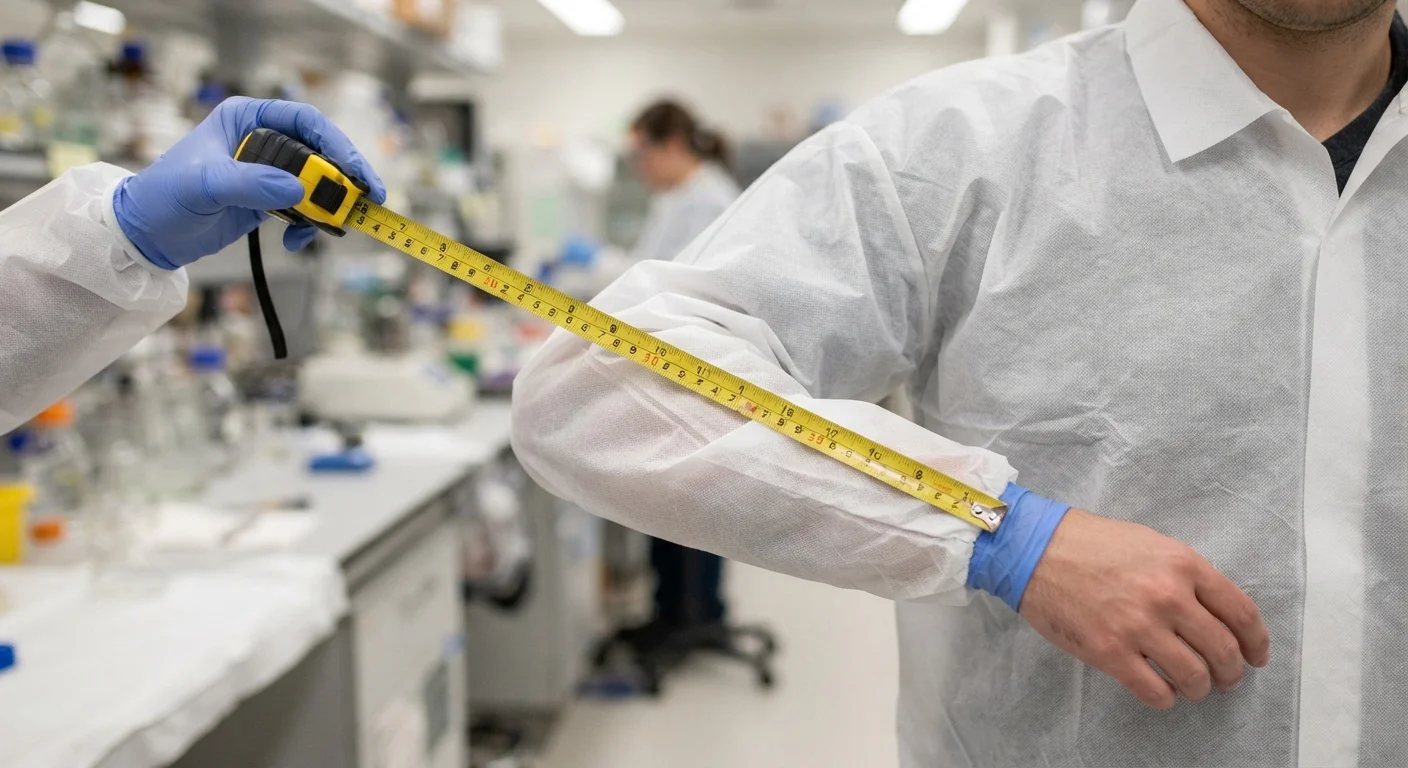
Sleeves get overlooked because chest and length steal the spotlight. That’s a mistake. A sleeve that’s even 5-10mm short leaves a gap between your glove and cuff—that’s where splashes find skin.
Step-by-Step Sleeve Measurement
-
Bend your arm slightly —about 15-30° at the elbow. Standing with a straight arm gives you a false reading; sleeves measured straight ride up the second you flex.
-
Find your shoulder point , where the shoulder seam sits at the top of your arm.
-
Run the tape down the outer arm , following the natural curve over the elbow, straight to your wrist bone—that bony bump on the pinky side.
-
Record this as your shoulder-to-wrist measurement. This is your 100% wrist-coverage baseline.
-
Measure both arms. Your dominant arm typically runs 0.6-1.3 cm longer, so size for the longer reading.
Why You Need Extra Length, Not Just the Raw Number?
Your finished sleeve should be slightly longer than your raw measurement—roughly 1.3 cm more. Lab gloves usually extend 5-7 cm up the forearm. For solid protection, your sleeve cuff needs to overlap that glove by 1-2 cm in working posture, not just when your arms hang still. Skip that allowance, and every time you raise your arm above chest height or pipette at shoulder level, your wrist pops out from under the cuff.
How To Measure: Waist & Hip (For Non-Standard Body Types)

Chest measurement doesn’t work for every body shape. If you’re fuller through the hips, broader in the seat, or your proportions don’t match a standard chart, waist and hip numbers become your backup reference.
Waist Measurement
-
Wrap the tape around the narrowest point between your lowest rib and hip bone—usually 1–2 inches above your navel.
-
Keep the tape parallel to the floor.
-
Exhale normally. Don’t suck in your stomach.
-
For a snug fit, a little finger should slip under the tape comfortably. If it can’t, loosen the tape.
-
Repeat 2–3 times and use the stable reading.
Hip Measurement
-
Measure around the fullest point of your buttocks and seat, typically 7–9 inches below your natural waist.
-
If you can’t pinpoint the fullest point, check at 6, 7, 8, and 9 inches below the hip bone, then use the largest reading.
-
Stand straight with feet together, tape level.
Why One Number Isn’t Enough?
Bust, waist, and hips don’t always scale together. You can have a smaller chest and fuller hips, or broader shoulders with a narrower waist. That’s why sizing charts built on chest alone fail non-standard bodies.
If your hip or seat volume is prominent, prioritize your largest true hip circumference over chest or waist when checking the lab coat sizing chart . Under-measuring hips is the most common cause of tightness through the seat and upper thigh.
For a full picture, calculate your waist-to-hip ratio: WHR = waist ÷ hip. Example: 90 cm waist ÷ 71 cm hip = 1.27. Cross-referencing this against your chest measurement gives you a clearer size match than any single number alone.
Disposable Lab Coat Size Chart Reference (Chest, Length, Sleeve by Size)
Numbers don’t lie, but they can mislead if you’re pulling from the wrong chart. The table below is the one you need for disposable lab coat sizing, plus the brand-to-brand gap that trips up bulk orders.
Standard Disposable Lab Coat Sizing Chart
|
Size |
Chest (cm) |
Chest (in) |
Body Length (cm) |
Sleeve Length (cm) |
|---|---|---|---|---|
|
S |
61 |
24.0 |
92 |
84.5 |
|
M |
63 |
24.8 |
95 |
88 |
|
L |
67 |
26.4 |
97 |
90 |
|
XL |
72 |
28.3 |
100 |
93 |
|
2XL |
75 |
29.5 |
103 |
95.5 |
|
3XL |
80 |
31.5 |
107 |
98 |
|
4XL |
85 |
33.5 |
111 |
101.5 |
|
5XL |
90 |
35.4 |
115 |
104 |
Standard tolerance: chest ±1 cm, length ±2 cm, sleeve ±1 cm.
Why Two Brands’ “Medium” Aren’t the Same Coat?
Chest sizing charts aren’t standardized across manufacturers.
Some brands start their XS at 39 in (99 cm) chest, adding roughly 2 in per size. Others start XS at 41.75 in (106 cm), jumping 4 in per size.
Run the same body through both systems, and you get different results:
-
41 in (104 cm) chest: sizes as S in the 39-in system, but only XS in the 41.75-in system.
-
45 in (114 cm) chest: falls near L in the 39-in system, but closer to S in the 41.75-in system.
That’s a two-letter-size swing on identical measurements. For one coat, it’s a nuisance. For a 200-unit order, it’s a warehouse full of returns.
Never assume letter sizes transfer across brands. Cross-check your raw chest measurement against the specific manufacturer’s chart before ordering, especially for bulk lab coat sizing where a mismatch multiplies fast.
How To Choose Between Two Sizes (Sizing Up vs Down)
Landing between two sizes on the chart is the most common sizing decision you’ll face. The rule is simple: go up, not down. If your chest measures 96-97 cm and the chart shows M topping out at 96 cm with L starting there, order the L. This is standard across disposable lab coat sizing charts and general apparel guidance.
The math favors sizing up. A too-small coat restricts shoulder movement by roughly 10-15° compared to what your job requires—bending, reaching, pipetting overhead. To get that range of motion back, you need 1-2 cm more shoulder width and 4-6 cm more armhole circumference than a snug fit provides. When two adjacent sizes differ by just 1-1.5 cm in shoulder width, that gap disappears the moment you size up.
When You’re Layering Over PPE or Scrubs?
Layering changes the math. If you’re wearing a lab coat over scrubs, another PPE layer, or bulky work clothing, your outer garment needs 10-12 cm of extra room through the chest and hip, not the standard 2-4 cm allowance for bare-body measurements. Measure your chest with the inner layer on. If that combined number lands between two sizes, size up without exception. Tight PPE over an inner layer restricts heat dissipation, which raises fatigue and heat-stress risk during long shifts.
The Dynamic Fit Test (Static Numbers Lie)
Static chest measurement and working chest measurement aren’t the same number. When you take a deep breath and extend your arms forward—the exact motion you use reaching for equipment or leaning over a bench—your chest circumference can expand 6-8 cm beyond its resting measurement. That means a well-fitting lab coat needs 8-10 cm of total room over your static chest, not the minimum 2-4 cm. If you’re already at the small end of that allowance, sizing up covers the gap. Sizing down guarantees you won’t have it.
Run this quick test before finalizing your order: bend forward, raise both arms overhead, then crouch slightly. If the coat pulls tight, rides up at the shoulders, or you feel seam tension anywhere, that’s your answer. Move up a size.
Shoulder, Collar, and Fit Checkpoints
Three quick checks settle most borderline decisions:
-
Shoulder seam : It should sit at or within 1 cm outside the bony point where your collarbone meets your upper arm. If the seam sits more than 1 cm inward and you feel pulling when you raise your arm, size up.
-
Collar space : With the collar closed, you should be able to slide one finger (about 1-1.5 cm) between your neck and the fabric. Anything tighter, especially if it restricts breathing, means the smaller size is out.
-
Seated stretch : Sit down and check the front panel and shoulders for visible strain. Standing fit and seated fit are different tests, and disposable fabric won’t let you compromise on either.
Waist and Hip Mismatches
If your chest measurement points to one size but your waist or hip measurement points to another, default to whichever size covers the larger measurement. Disposable coat fabric doesn’t stretch and can’t be tailored down after the fact, so a mismatch between body zones always resolves in favor of the bigger number.
Footwear Follows the Same Logic
The sizing-up principle isn’t limited to coats. If you’re also ordering disposable shoe covers or lab footwear and your foot length falls between two sizes—say, 26.3 cm with size breaks at 26.0 and 26.5—choose the 26.5. You want 0.5-1.0 cm of space between your longest toe and the shoe’s edge. Standing flat, your toes shouldn’t touch the front seam.
Unfamiliar Brand? Add a Buffer
Ordering from a brand or manufacturer you haven’t used before adds another layer of uncertainty. Chest and waist measurements for the “same” labeled size can vary by 2-4 cm across different suppliers. When you’re unfamiliar with a brand’s cut and your measurements sit near a size boundary, add a size and build in 3-5% for potential shrinkage if the material has any cotton or natural fiber blend. A 70 cm body length can shrink 2-3 cm after laundering, though most disposable lab coats skip this issue since they’re single-use and non-woven.
The risk math is lopsided in favor of sizing up. A coat that runs slightly high costs you 2-3 cm of extra fabric at the waist or cuff—cosmetic, not functional. A coat that runs small restricts movement, strains seams, and in PPE contexts, actively compromises the protection it’s supposed to provide. Before you place a bulk order, confirm the return policy. If exchanges are free or low-cost, most procurement guidance defaults to ordering the larger size first and adjusting only if it proves unnecessary.
Special Fit Considerations for Layering & PPE Compatibility
PPE doesn’t work in isolation. It works as a system, and that’s the mistake most buyers make when they size a lab coat based on the coat alone.
A 2022 systematic review looked at 16 studies on PPE fit. 88% found fit had a statistically significant effect on occupational performance. That’s the difference between a coat that protects you and one that just looks like protection.
Test the Full Stack, Not Just the Coat
You should fit-test everything you wear at once — scrubs, lab coat, gown , gloves, goggles, and respirator if you’re using one. Manufacturer guidance, including 3M’s, recommends documenting fit at every layer, not just the outer piece.
Run through this checklist with the full stack on:
-
Reach, bend, kneel, and lift. Sleeves should stay at the wrist. The hem should stay below the waist when you bend.
-
Check strap tension. Goggle bands, respirator straps, and garment collars should not push each other out of position or break a seal.
-
Re-test after adding thicker gowns, double gloves, or face shields. Each one changes how the coat moves with you.
Build in Layering Room, Not Just Layering Length
For arc-rated or FR systems, you need to test the layers together if they’re meant to exceed single-layer protection. Outer layers should stay arc-neutral and meet ANSI/ISEA 203 for secondary FR use, verified through ASTM F1930 thermal manikin testing. That’s a technical standard, but the practical takeaway is simple — do not assume your outer coat performs the same way once it’s stacked over other PPE. Test the combination, not the component.
For chemical-exposure ensembles, selection guidance recommends a 5:1 safety margin between breakthrough time and expected exposure duration. If your lab coat is part of that layered system, sizing has to leave room for the full stack to close and seal properly. It needs to fit as a system, not just alone.
Common Sizing Mistakes & How To Avoid Them
Sizing errors cause half of all clothing returns. That number alone should change how you order disposable lab coats.
Mistake #1: Trusting the S/M/L label instead of the actual measurements. Between manufacturers, a “Medium” chest can swing 2–3 inches (5–7.5 cm). If you order by habit instead of using the lab coat sizing chart, you’re gambling with someone else’s fit data, not yours.
Mistake #2: Measuring over thick clothing or pulling the tape too tight. A tape cinched too snug shrinks your reading by 2–3 cm, pushing you into a size that’s too small. Measuring over a hoodie adds several centimeters the other way. Either error skews your chest measurement before you even open the sizing chart.
Mistake #3: Letting the tape sag or tilt. Off-level measurements introduce 0.5–2 cm of error on chest and hip readings, enough to land you on the wrong side of a size break.
Mistake #4: Measuring only chest, waist, and hip. Skip shoulder width, torso length, or arm length, and you’ll get a coat that fits your circumference but fails at the shoulders, sleeves, or hem – exactly the fit problems this guide is built to prevent.
Fix it: measure twice, keep the tape parallel to the floor, wear a thin layer, and always cross-check against the specific brand’s chart instead of your usual size.
FAQ: Troubleshooting Fit Issues
Fit problems show up after the box arrives. Here’s how to fix the three most common ones.
My Lab Coat Arrived Too Small — What Now?
Check the chest, sleeve, and shoulder. Raise both arms overhead and bend forward. Pulling across the back or chest means a chest issue. A sleeve riding up past your forearm mid-reach means a sleeve issue. Photograph the strain points from front, side, and back. Then measure your actual chest, sleeve, and length against the supplier’s finished-garment chart. A gap of 2 cm or more between your measurement and the chart value means a manufacturing defect. Most suppliers cover free replacement under standard tolerance policies. If you’re stuck wearing it short-term, check the side seams for 1 cm or more of spare seam allowance. Letting it out adds 2–4 cm of chest room.
Is a Slightly Oversized Lab Coat Okay to Use?
Often, yes. A chest allowance of 8–15 cm beyond your body measurement gives you room to move without being unsafe. Sleeves extending 2–4 cm past your wrist bone are fine if you roll the cuff. Length running 5–8 cm past your target hemline is acceptable for most bench work. If you exceed 20+ cm at the chest, 6–8 cm at the sleeve, or 10+ cm at the hem, you risk snagged cuffs and tripping hazards. Do three squats and a 30-second simulated bench task to test it. If sleeves or hem stay clear of surfaces and your line of sight, keep wearing it.
Do Sizes Match Across Different Lab Coat Brands?
No. Never assume a “Medium” from one supplier matches another’s. Finished chest measurements for the same labeled size can swing 2–5 cm between brands, sometimes more. A size M lab coat’s chest can run anywhere from 104 to 112 cm depending on the manufacturer, and waist sizing on companion garments can vary 2–4 cm at the same labeled measurement. Always request the finished-garment measurement chart. Verify chest, shoulder width, sleeve length, and body length individually before placing a bulk order.
Conclusion
Getting your lab coat measurements right takes five minutes with a tape measure, not five minutes of guessing. Your chest measurement gives you your base size, your body length determines your actual protection coverage, and if you’re between two sizes on the sizing chart, sizing up is almost always safer and more comfortable.
A fitted disposable lab coat gives you protection that works, unrestricted movement, and no wasted budget on returns or reorders.
Grab that tape measure, pull up the size chart from this guide, and match your numbers before you order. If you’re purchasing in bulk for a team, measure a few different body types first—it’ll save you a logistics headache later.